PicoNav User Manual
Complete guide to using your PicoNav device.
Table of Contents
- Getting Started
- Hardware Overview
- Charging your PicoNav
- Understanding Your Pico
- Notification LED
- Status Screen
- Inventory
- Deck
- Venture
- Shop
- Wardrobe
- Sleep
- Options
- Basics of Battle
- Using the PicoNav Update Tool (PNUT)
Getting Started
Welcome, Navigator. Thank you for guiding your Pico in a brand new journey together! This information will serve as a complete guide to using the PicoNav.
Hardware Overview
The PicoNav is a tiny device with only two buttons that will be referred to as the A and B button.
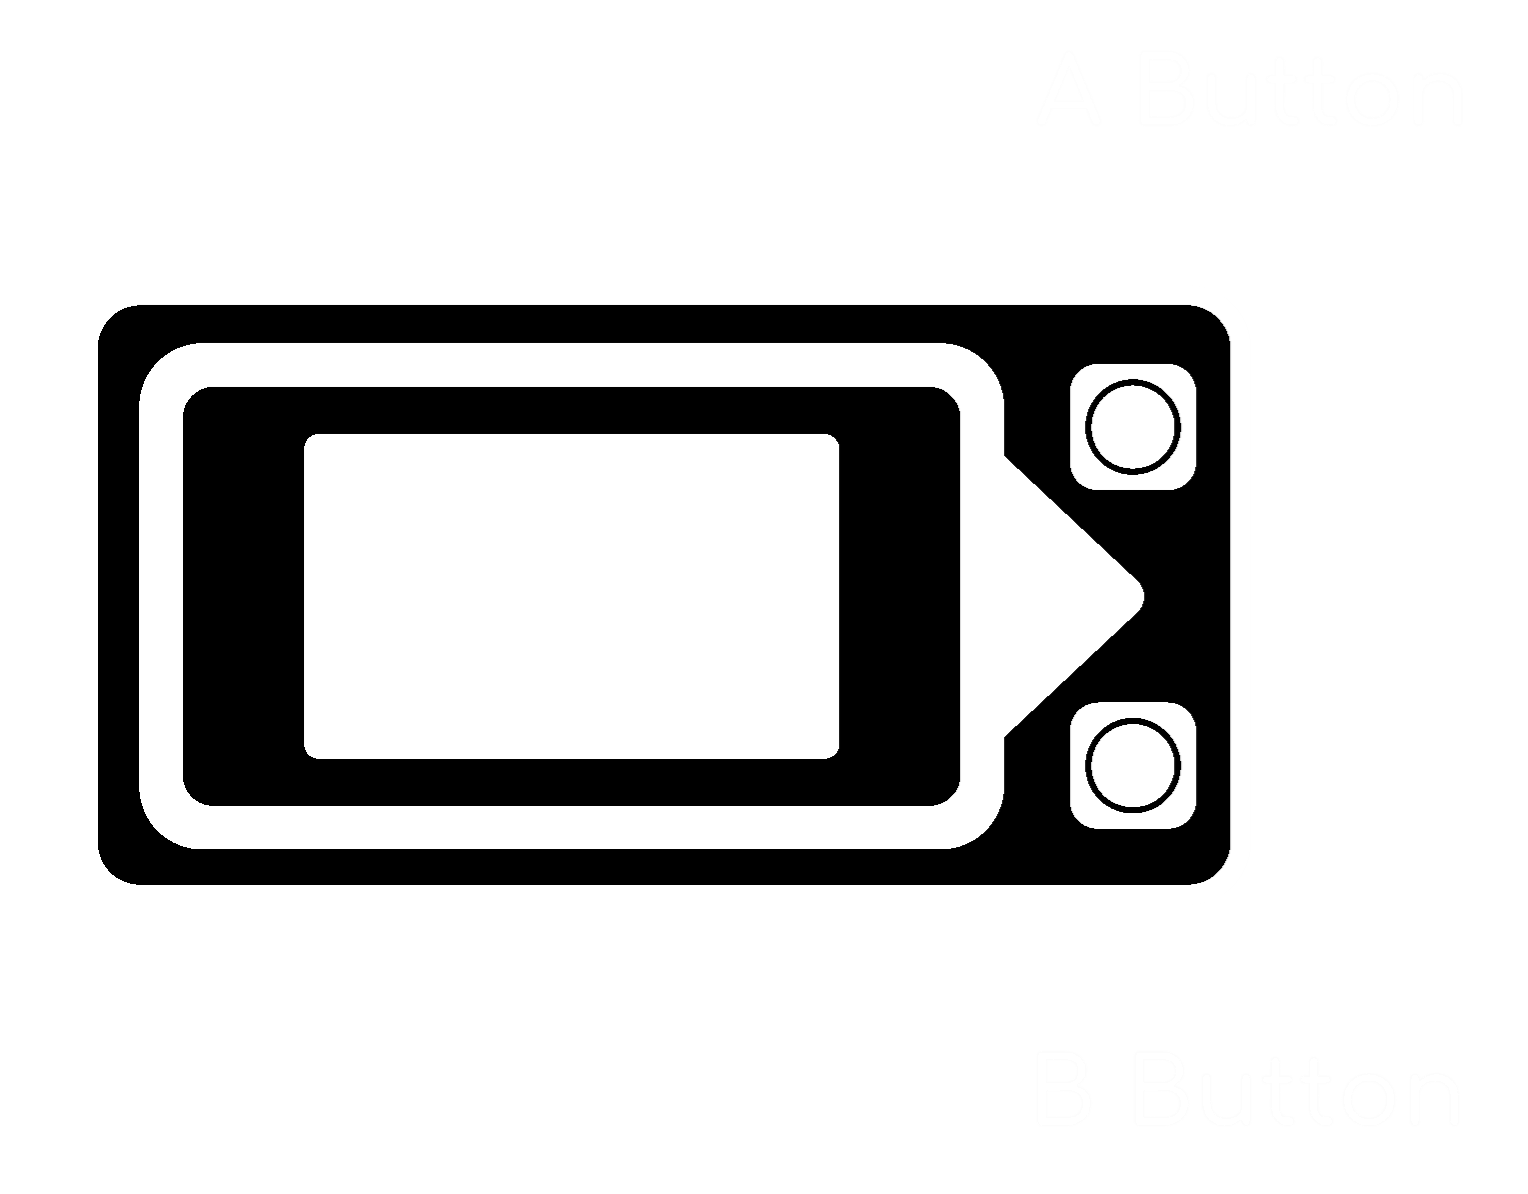
These buttons can be pressed and held to perform various actions throughout the device, but generally speaking:
- Pressing the A button will cycle through menus
- Pressing the B button will confirm menus
- Holding the A button will typically return or cancel
- Holding the B button will provide more information
Charging your PicoNav
Standard USB and 5V charging is recommended for the PicoNav. While there is a basic charging IC built into the device to prevent overcharging, avoid fast charging and USB C Power Delivery devices wherever possible.
Understanding Your Pico
After completing the navigation tutorial and introduction, you will be greeted with your Pico in what we call the Main Menu. This menu is where you can find your Pico idling or adventuring, and it is the menu that all activities will return to. Below is a reference of some of the icons in the Main Menu.
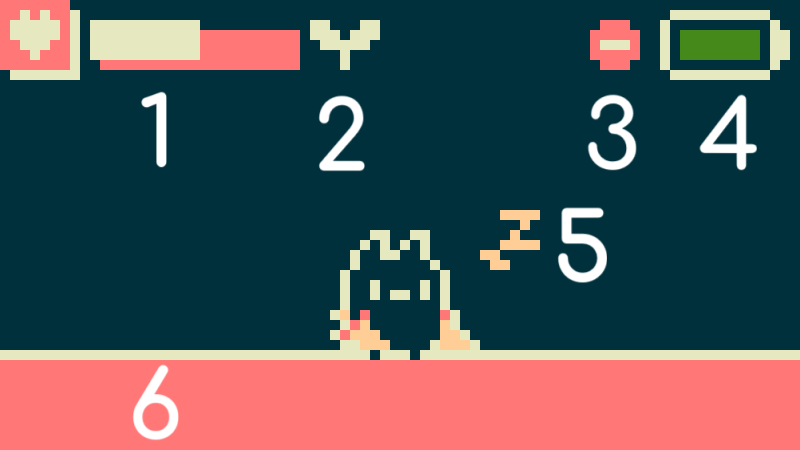
- Your Pico’s current HP
- Crops available to harvest in the Farm
- Do Not Disturb activated
- Current battery level
- Your Pico’s current mood/emotion
- Navigation text through the Main Menu
Notification LED
The PicoNav features a notification LED on the top right of the system that displays different colors to alert you to various states and events. Below is a reference of what each color indicates:
| LED Color | Meaning |
|---|---|
| Orange | Your Pico is hungry (FOOD is low) |
| Purple | Your Pico is tired (STAM is low) |
| Pink | Your Pico is both hungry and tired |
| Turquoise | Planted crops are ready for harvest |
| White | Random event is active |
| Red | Injured Pico is ready to revive |
| Rainbow | Venture encounter is ready |
| Red (Blinking) | Low battery |
| Green (One Pulse) | Battery is charging |
Note: LED brightness can be adjusted or turned off entirely in the Options menu. Do Not Disturb mode can be quickly toggled by pressing and holding both the A and B buttons in the main menu.
Status Screen
Pressing the B button in the Main Menu will take you to the Status Screen that shows Your Pico’s current status as well as their name. These status meters are directly tied to your Pico’s combat stats in battle and are vital to maintain.
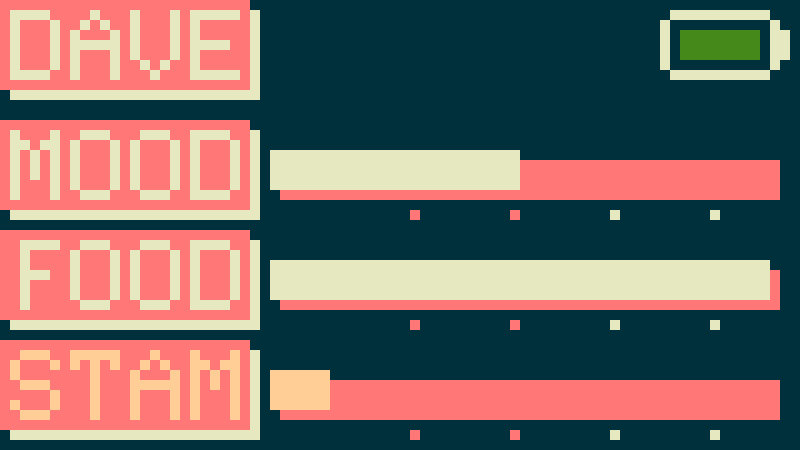
Each status meter goes from 0 - 100% has an indicator below that will give your Pico a stat multiplier based on the value of that status:
| Meter Percentage | Multiplier |
|---|---|
| 100% - 91% | 1.25x |
| 90% - 71% | 1.10x |
| 70% - 51% | 1.00x |
| 50% - 31% | 0.90x |
| 30% - 0% | 0.75x |
MOOD - Your Pico’s happiness affects its Attack stat. This status increases while not venturing in a dungeon as Picos are not very fond of work. Being awake while not venturing will increase mood at an accelerated rate. This status decreases when venturing into a dungeon or by losing a battle.
FOOD - Your Pico’s hunger affects its Defense stat. This status naturally decreases over time and is increased by feeding it. Sweet Fruit is the primary way of feeding your Pico and can be farmed or purchased from the shop. When the FOOD meter is completely depleted, your Pico will begin to lose health over time until they hit 1HP.
STAM - Your Pico’s stamina affects its Speed stat. This status slowly decreases over time throughout the day, and is also spent to venture into a dungeon. This status is increased by sleeping or by consuming an Energy Drink.
Pressing the B button once more will show you the individual stat points as well as your current Venture progress and your total amount of credits you currently possess:
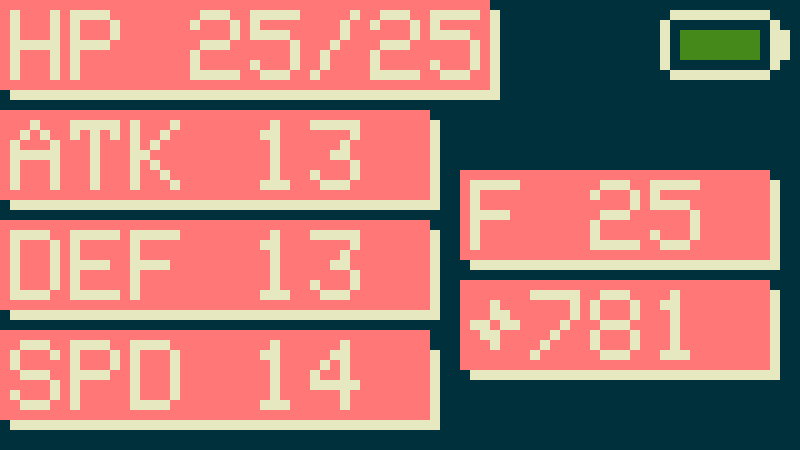
Note: While playing the normal Venture mode, progress is denoted by the number of floors cleared with an “F”, while in the Deep Dungeon mode progress is denoted with a “D”.
Inventory
Pressing the A button while in the main menu will take you to a suite of menus. First and foremost is the Inventory menu. This is where consumables such as Sweet Fruit and Health Potions are kept. Each collected consumable can have up to 9 of a single item in your inventory.
- Pressing A on this screen will cycle between the items and navigation
- Pressing B on an item will consume the item. Pressing B on the page number will cycle to the next page
- Holding A will return you to the Main Menu
- Holding B on an item will give more information about the item
Deck
The Deck Menu is where players can build and equip up to 3 different decks used for battle. The Deck Menu is split into three main sections:
- Deck Selection
- Deck Edit
- Card/Gem Selection
Deck Selection
The first portion of the Deck Menu has you select a deck to view and edit.

- Pressing the A button here will cycle between decks
- Pressing B will select the hovered deck to edit the contents of the deck. This is denoted by an outline around the square deck index
- Holding A will return you to the Main Menu
- Holding B will equip the hovered deck. This is denoted by changing the color of the square deck index.

Deck Edit
The second portion of the Deck Menu allows you to choose the specific deck slot you wish to edit. Each deck contains 10 cards and up to 1 gem. Each deck can have up to two copies of a card, denoted by the pips under the card name.
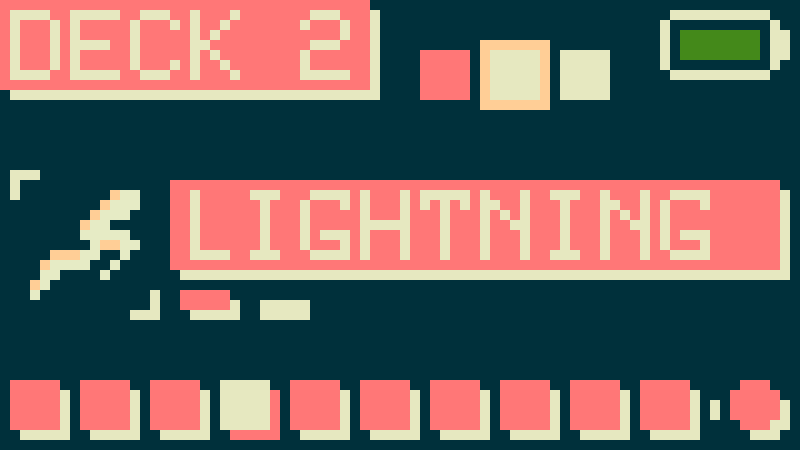
The current item being viewed and hovered is denoted by the lighter/reversed color on the bottom portion of the screen. Each square signifies a card in the deck and the circle at the end of the deck signifies the gem slot for that deck.
- Pressing the A button here will cycle through the cards and gem within the deck
- Pressing B will select the hovered card or gem to choose a new item to replace it with
- Holding A will return you to Deck Selection
- Holding B will give you more information about the specific card or gem you are hovering over
Card/Gem Selection
The third portion of the Deck Menu allows you to swap the current selected card or gem with a different on in your collection.
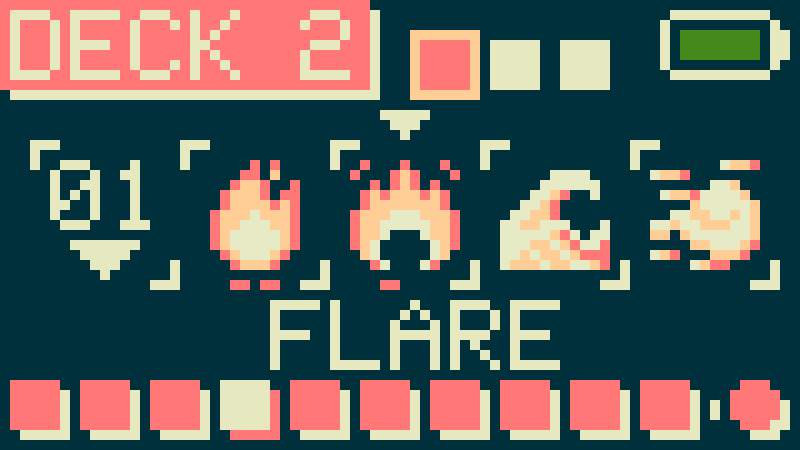
- Pressing A on this screen will cycle between the items and navigation
- Pressing B on an item will add that card or gem to the deck and replace your old card. Pressing B on the page number will cycle to the next page
- Holding A will return you to the Deck Selection Menu
- Holding B on an item will give more information about the card or gem
In this menu, you can also see how many copies of a card you have in the deck if there are pips under the card icon.
Venture
The Venture Menu is where is your Pico can travel to different locations. In this menu you can access the Farm or begin a venture into a dungeon.
Farm Menu
In the Farm Menu you may plant one of three different crops to harvest at a later time. Each crop takes 8 hours of real world time to fully bloom for harvesting. When a crop is ready for harvesting, an icon will appear in the main menu and the notification LED will pulse turquoise. Once harvested, you will be granted a random quantity of 1-3 stacks of the harvested item.
Venture Menu
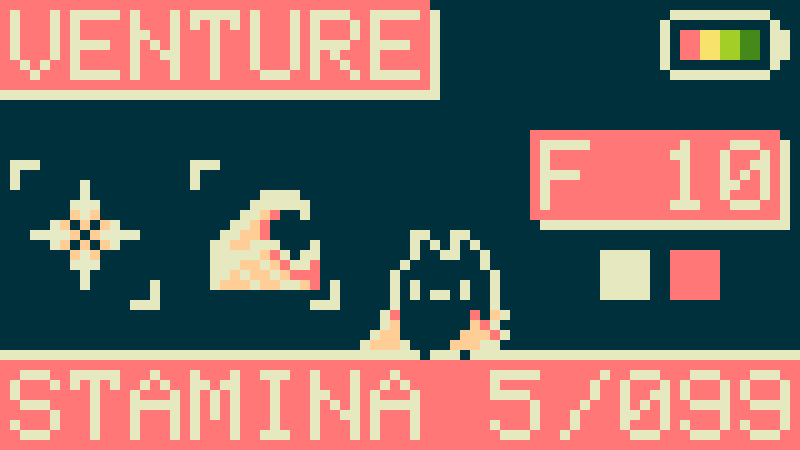
In order to begin your quest for loot and progression, a venture must be started. In this menu players can see their next opponent as well as the first two available cards in the opponent’s deck. Pressing and holding the B button will give more information about the first card.
Each venture consumes 5 stamina points and places your Pico in the “Venturing” state where a timer ticks down in the main menu. The default time for a venture is 30 minutes and once ready, pressing either the A or B button will initiate a battle.
While in the Venturing state, Picos may not sleep. You may return to the Venture Menu to cancel your current venture if necessary, though stamina points will not be refunded.
Deep Dungeons
Once players clear all 30 main floor dungeons, a new option unlocks in the Venture Menu to begin Deep Dungeon runs. The goal of the Deep Dungeon is to get as far down as possible before getting KO’d. While in this mode:
- Player’s card collections are reset to their starter cards
- Opponents will be fully randomized (gear and decks) and possess the chance to have a random gem equipped
- Cards will have a 20% chance to drop as a random reward to use for your current run
- Head and body gear have double the drop chance (20%) compared to the main Venture mode
- Med Kits are disabled while in the Deep Dungeon
- Player Inventory, Gems (but not cards), and Wardrobe are still fully accessible between modes
Once a player is KO’d, they will be removed from the Deep Dungeon and return to the main Venture mode will all of their original cards in their collection.
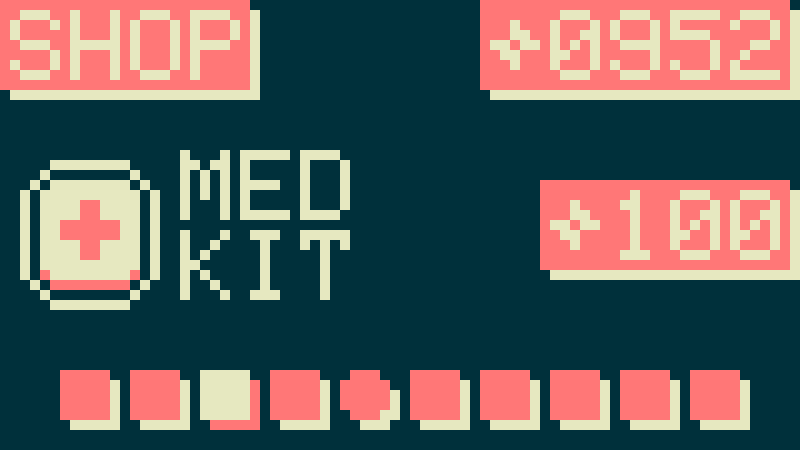
Shop
As you progress through dungeons and win battles, you will earn credits to spend in the shop. In the shop you will find standard items such as Med Kits and Health Potions, but there is also a chance to find rare items such as Card Boosters and Random Gems. These rare items are denoted by a circle icon and are re-rolled after a battle.
Wardrobe
The wardrobe is where you can change your Pico’s outfits with gear you have acquired. Players can save three different outfits and they are not tied to a specific deck our loadout. Each gear set consists of a head and body gear piece and have no direct effect on your Picos stats, making them purely cosmetic. Similar to the Inventory and Deck menus, the Wardrobe is split between an Outfit Selection section and a Gear Selection Section.
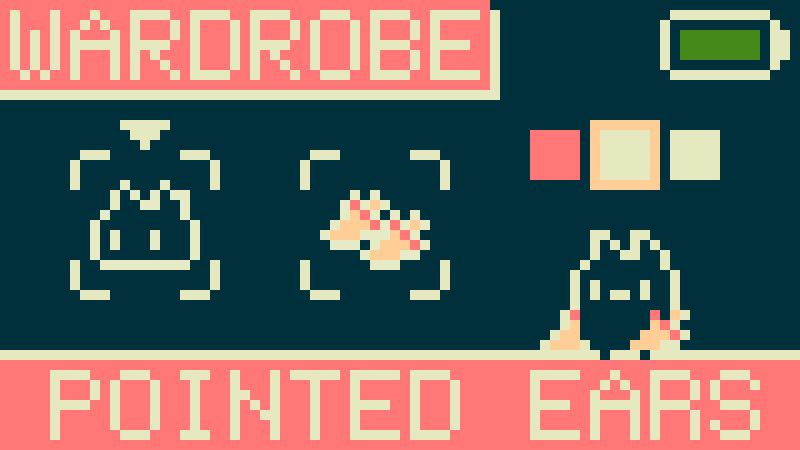
During Outfit Selection:
- Pressing the A button here will cycle between outfits
- Pressing B will select the hovered outfit to edit your outfit. This is denoted by an outline around the square outfit index
- Holding A will return you to the Main Menu
- Holding B will equip the hovered outfit. This is denoted by changing the color of the square outfit index.
For a full list of gear items, click here.
Sleep
Over the course of time your Pico will grow tired. Putting them to sleep is the primary way to recoup your stamina. While asleep, your inventory will be inaccessible and you cannot go on Ventures and the rate of hunger will slow down while asleep. You may wake your Pico up at any time by cycling to the “WAKE” option.
Options
The Options menu contains various useful settings and options to make using the PicoNav more convenient.
Pause
At any point in time you may pause the game by choosing this setting. While paused, time and progress are completely halted and may be resumed by going back to this setting to Resume operation. This is useful while travelling for extended periods of time and you wish to maintain your Pico’s current health and statuses.
Backlight
You can adjust the screen backlight to different brightness settings (Low, Medium, High. Default is Medium)
LED
You can adjust the notification LED to different brightness settings or turn the LED off entirely (Low, Medium, High, Off. Default is Medium)
Backup
This option is used in conjunction with the PicoNav Update Tool (PNUT) to back up your current save into a file on your PC. For more information, please refer to the PNUT usage section.
Restore
This option is used in conjunction with the PicoNav Update Tool (PNUT) to restore your save file from your PC back to our PicoNav with a compatible software version. For more information, please refer to the PNUT usage section.
Power Off
This setting powers the PicoNav off until the A button is pressed again.
Reset All
Resets all settings back to factory (WARNING: SAVE DATA WILL BE DELETED).
About
Displays the current software version of the PicoNav being ran on the device.
Basics of Battle
Battles are a core function in the PicoNav and understanding what is happening on a one inch screen can be daunting at first. In this section we will cover the flow of battle and the break down the visual elements on the screen during gameplay.
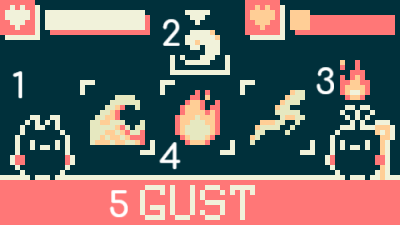
- Player Counter (if available)
- Arena Counter (if available)
- Opponent Counter (if available)
- Player Hand (Card Selection)
- Card/Counter Name
At the start of the battle players will choose the card they wish to use. During a battle, many cards will have the ability to place, remove, and replace counters on the field as well as do damage or buff/debuff players. Tracking this information with two buttons can be done as follows:
- Pressing the A button cycles through your current context (card list or counters)
- Pressing the B button selects the hovered card to use in battle for the upcoming turn
- Holding the A button changes context from Card view to Counter view.
- Holding the B button gives more information about the particular card or counter selected and their effects
- Holding both the A and B buttons gives you the option to concede the battle. Conceding is still considered a loss and your Pico’s mood will decrease as well as lose some credits, but you will not have to worry about the injury timer or losing more HP.
Once the card has been selected, the faster Pico attacks first. Some cards have priority assigned to them, which increases the speed calculation for the turn and will often times go first. The turn order goes as follows:
- The faster Pico (P1) attacks first
- The slower Pico (P2) attacks second
- If applicable, the counter of P1 activates
- If applicable, the counter of P2 activates
- If applicable, the Arena counter activates.
- The next turn begins
There are several different cards with unique effects that can be difficult to convey full descriptions over 39 characters of text, so you can find the full card list here.
Battles are won by KOing the other player and winning a battle grants a random amount of credits (1-3 credits) as well as a chance for cards and/or gear based on the game mode. Health does not recover to full after a battle, so staying healthy is key!
Losing a battle will see Pico’s mood drop by 50 points and half of their credits will be lost! Your Pico will also be injured and unable to venture into another dungeon for one hour unless a Med Kit is used.
Using the PicoNav Update Tool (PNUT)
To be documented